Home » Articles posted by Amaya Hood
Author Archives: Amaya Hood
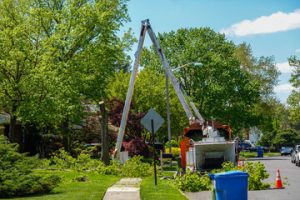
Safe Tree Removal Techniques
If a tree has been damaged or is dead or diseased, it may be unsafe and should be removed. This job requires a professional and should be done using safe, effective techniques such as rigging or crane-assisted removal.
A thorough inspection of the tree should be made by an ISA Certified Arborist before any work begins. A well-done inspection will help you determine the best method for safe, efficient tree removal. Contact Worcester Tree Removal for professional help.
If a tree appears dead or dying it’s important to identify what’s causing the problem. This is important because some disease or insect infestations can be curbed and the tree saved. Unfortunately, some dead trees are unable to be revived and must be removed.
When a tree is unhealthy it isn’t just an eyesore to the property; it also poses health hazards for surrounding plants and people. Weakened or dying branches are at risk of falling off during storms, posing a threat to cars in the parking lot, structures, or power lines. Even the whole tree can collapse, leading to injury or death.
A dead or dying tree will also cause damage to the soil and nearby trees. The decaying tree will attract unwanted insects or pests like termites and rats that seek out the rotting environment. In the worst cases, the insects and pests can spread to healthy trees.
There are many ways to determine if a tree is dead, and it’s best to consult a professional arborist to be sure. Some visual signs of a dead tree include an unseasonal lack of leaves and brittle or dry branches that break easily. The trunk and base of the tree can also be inspected for fungal growth.
While the fungus that grows on dead or dying trees is an initial indication of rot, it isn’t always the case. In some cases, the fungus is only present on the surface of the rot and the internal structure is still alive.
To determine the condition of the roots, dig around the base of the tree and perform a snap test. Healthy roots are firm and white, while dead roots are soft, mushy, or discolored. You can also try a scratch test by scraping the bark with your fingernail. If the inner bark is green, the tree is alive and healthy. If the scratch marks turn brown or black, the tree is dead and should be removed.
Ownership of the tree will dictate who is responsible for removing it. If the tree is entirely on one property, the owner is responsible for the removal. However, if it straddles a fence line or is in a shared yard, the responsibility may be split.
Diseased or Infested Trees
Trees can be susceptible to a variety of diseases and pests that can lead to their death. Some of these issues can be corrected through regular professional care, but in some cases, the best option is to remove the affected tree.
If a disease is present, it should be treated and/or removed as quickly as possible to reduce the spread of infection to other trees on your property. A certified arborist can help you identify if a diseased tree is a threat and can recommend the best solution for your home or business.
Some diseases, like elm ash borer (EAB), spread from tree to tree through beetle feeding or root graft infection. In this case, it may be necessary to remove the infected tree, dig up the stump and grind it, and treat or remove any infected branches or limbs nearby. This will protect other elms, maples, birches and spruce on your property from further EAB infestation.
Other diseases, such as tar spot and powdery mildew, are more cosmetic in nature but still impact the health of the tree. Both can cause stress in a tree, especially when the leaves are not able to fully photosynthesize due to the fungal infections. This additional stress can lead to more serious problems, including water and nutrient shortages that can weaken a tree.
A tree that is severely weakened by disease or insect damage is likely to become a safety and structural hazard during storms or high winds. Some species of trees are more prone to this than others, such as oaks, beech and cherry, or conifers such as pines and spruce.
A certified arborist can check your trees regularly to look for harmful bugs or diseases. They can also help prevent these issues from occurring in the first place with regular pruning, watering and fertilization practices. They will know which treatments are safe for your trees and their environment, and how to use them effectively. This prevents your home or business from being overtaken by an uninvited guest – a tree pest or disease!
Safety Hazards
Tree removal is a serious endeavor that involves heavy equipment and high-risk work. It’s essential to take the right precautions to avoid injury and property damage. By evaluating the situation, choosing the proper tools and safety gear, executing the procedure with precision, and conducting a thorough post-removal cleanup, you can ensure that the area is free of hazards for years to come.
One of the most common mistakes homeowners make is trying to remove a tree without proper knowledge or experience. This can lead to severe injuries and costly property damage. It’s critical to hire an ISA certified arborist with extensive training and knowledge of tree physiology.
Before starting a tree removal project, it’s vital to fully assess the site. Look for signs of instability, such as leaning trunks or cracked branches, and examine the roots to determine their condition. Also, check for power lines and other potential hazards. During the process, it’s important to ensure that all workers and bystanders are a safe distance away from the area.
The type of tree removal will depend on the location and surrounding structures. If the tree is positioned close to homes or other structures, it should be removed immediately. It’s also necessary to consider the weather conditions, as strong winds can affect a tree’s stability.
A professional tree service will conduct a thorough inspection of the tree and its surroundings before beginning the removal process. They will identify any structural issues and check for dangerous limbs. They will also scan for potential hazard zones and locate any underground wires or cables. They will also assume that all ground power lines are energized and contact the utility company to have them turned off.
After a thorough inspection, the tree service will determine the best method to remove the tree. They will follow a strict protocol to minimize risks. This includes estimating the direction of the fall and clearing up the surrounding area. Then, they will cut a notch at the base of the desired fall zone and wedge it into place to guide the tree down safely.
Stump Removal
Stumps are not only unsightly, they are also dangerous for children and pets who might run into them. If you decide to remove a stump, there are several options for doing so safely and effectively.
Stump grinding is the best option for those who want to quickly and safely remove a tree stump. This involves removing the entire stump and root ball, leaving a hole in its place. This method is also the most effective for preventing regrowth, as it ensures that there are no residual roots that can cause problems in the future. However, it is more expensive than other methods.
It Can Be Very Time-Intensive
This method of stump removal requires heavy labor. Begin by digging around the stump with a shovel or axe to expose all of its roots, then use a chainsaw to cut off any that extend outwards from the main body of the stump. You can then work to sever all of the other roots, pulling them out and dragging them away with a pry bar. This process can be very labor-intensive, especially if the stump is large or located in an awkward position.
It Can Be Environmentally Unsafe
Using chemical stump killers can be environmentally unsafe, as they can leach into the soil and poison surrounding plants. They can also be toxic to pets and wildlife. They may also damage the ground, causing it to erode or sink. They can also be hazardous if accidentally inhaled, and they can create a fire hazard if not used properly.
In addition, chemical stump killers can take weeks or even months to work. This means that they are not a good solution for those who are in a hurry to remove a stump. It is important to note that they only speed up the natural rotting process, which would otherwise take over a decade in some cases. Ultimately, it is best to seek professional stump removal services for this task. It is not only safer and more effective, but it will also save you a great deal of time and effort in the long run.
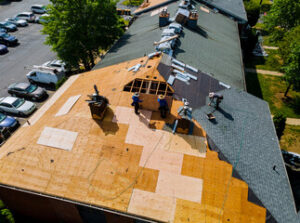
The Importance of Residential Roofing Contractors
Roofing contractors play a critical role in protecting your home. They are responsible for repairing your roof when it gets damaged and can help you choose the right materials. They can also help you increase the value of your home.

Before you hire a roofing contractor, check their qualifications and insurance coverage. Contact Residential Roofing Contractors Erie PA for professional help.
Whether they’re installing new shingles or conducting roofing repairs, residential contractors provide invaluable services to keep homes safe and secure. A sturdy roof is a home’s first line of defense against the elements, and it plays a critical role in its overall aesthetic and value. Residential roofing professionals are trained to recognize and diagnose a wide range of problems, from leaks and mold to structural damage and inadequate ventilation.
When choosing a professional roofing contractor, be sure to examine his business’s background and work history. A qualified roofing company will be able to provide client references and a list of completed projects. You should also ask for detailed estimates and a description of the scope of work. If possible, you should also request a warranty for the project.
A quality contractor will take the time to properly install and finish each step of the roofing process. This includes nailing down each shingle and ensuring that it’s positioned correctly. In addition, a quality roofer will use specialized tools to ensure that all nails are set at the proper depth. This prevents the nails from pulling through the roofing materials and causing damage to the structure of the roof.
It’s also important to choose a contractor with an excellent reputation for quality workmanship and customer service. Ask for recommendations from family and friends, or read online reviews. It’s a good idea to look for local roofing contractors, as they’ll be more familiar with local weather conditions and building codes. Additionally, they’ll be more accessible for follow-up work or warranty claims.
Finally, make sure your roofing contractor is insured and licensed to perform roofing work in your state. If not, you may be subject to fines or other legal consequences. Check with your local Department of Professional Regulation or licensing board for more information. In addition, ask your roofing contractor about his worker safety programs and industry education. You should also carefully read and understand any warranties offered. Look for a warranty that covers both labor and materials and avoid those with “lifetime” coverage.
Licensed
Whether you’re a homeowner seeking roofing services or a contractor looking to grow your business, licensing is essential. Licensed contractors are more likely to adhere to industry standards and regulations, which can protect you from shoddy workmanship or improper application of materials. They’re also more likely to have liability and workers’ compensation insurance, which can protect you from any financial burdens if something goes wrong during the project.
Licensing requirements vary by state, from rigorous statewide licensing systems with formal trade exams and extensive background checks to simple local registrations or none at all. However, the benefits of a licensing system are widespread. For example, licensing helps you establish trust with clients and shows that you’re committed to professional excellence. Additionally, it opens up opportunities for securing larger projects and expanding into specialized services.
In many states, roofing contractors must be licensed in order to perform work on commercial or residential projects. While there are some exceptions, such as day laborers or contract laborers (those who are paid directly by the client but don’t carry their own license), most roofing contractors must obtain a general building or roofer’s license.
To become a licensed roofing contractor, you must have relevant experience and pass a state-specific exam. Some states offer apprenticeship programs that combine on-the-job training with classroom instruction to help you meet the experience requirement. You can also attend a vocational school or enroll in a roofing-specific program to speed up your learning and earn credentials. In addition to work experience, you’ll also need to submit proof of financial stability and liability insurance. Tip: Use tools like InvoiceFly Time Tracking Software to log your hours and keep detailed records to make the process smoother and ensure you’ll be able to meet your state’s licensing requirements.
Once you’re a licensed roofing contractor, it’s important to maintain your credentials by submitting updated insurance documents and renewing your license annually or biennially. Some states also require continuing education as part of the renewal process. This may not be the most fun part of running a roofing business, but it’s an important step to ensuring legal compliance and staying competitive in your industry.
Reputation
The roof is a vital part of a house, protecting it from natural elements and keeping interiors safe. Like many other parts of the home, it is subject to aging and damage over time, which can leave homeowners in need of repairs or even full replacements. Choosing the right residential roofing contractor can help to ensure a job well done that lasts for years to come. Finding a good local roofing contractor starts with a thorough investigation. Look for essential qualities such as licenses, reputation, and experience to guarantee quality work that is worth the investment.
A solid residential roofing contractor will prioritize effective communication and customer service. When choosing a roofer, pay attention to how they respond to your questions during the initial consultation process and throughout the project. Ideally, they will provide clear and concise answers, avoiding any vague or confusing language. Additionally, a reliable roofer will be eager to address any concerns promptly and will be available for follow-up after the project is completed.
Local references and online reviews can provide valuable insights into a roofing contractor’s reputation and reliability. Look for positive reviews that showcase professionalism, quality workmanship, and a strong customer service experience. Additionally, read any negative feedback to identify any common problems or red flags.
Visiting a roofing contractor’s website can offer an insight into their previous work, including photos showcasing the range of roofing styles they have worked with. Many contractors also have a portfolio section that allows visitors to see the results of their projects and determine whether their style aligns with their vision for their own home.
When choosing a residential roofing contractor, make sure they have the proper insurance coverage and manufacturer certifications. This is non-negotiable, as it protects you from liability if something goes wrong during the project. Insurance should cover any property damage, worker injuries, or even theft of materials and equipment.
In addition, a reputable roofing contractor will be willing to provide a detailed estimate that clearly breaks down the cost of materials, labor, warranties, and any potential contingencies. Be wary of contractors who give verbal estimates, as these can often lead to unexpected expenses down the road.
Insurance
Residential roofing contractors are unsung heroes – they repair roofs when needed, especially after damaging weather events. Choosing the right contractor can make all the difference in both the quality of work and the success of an insurance claim in the event of a loss. Licensed and insured roofing contractors will have the necessary experience and expertise to properly install and repair your home’s roof. They should also be able to provide proof of proper licensing and insurance coverage.
Licensing requirements vary from state to state, so it is important to verify whether a roofing contractor is licensed in your area. In addition, it is a good idea to ask the contractor for references from previous clients and a list of completed projects. You should also check with your local Better Business Bureau to find out if any complaints have been filed against the company. Additionally, the roofing contractor should be a member of a local, regional or national roofing industry association, such as NRCA. Membership demonstrates a commitment to the industry and professionalism.
The best roofing contractors will have liability and workers’ compensation insurance, as well as professional and general liability coverage. This insurance protects homeowners in the event that a roofing contractor is responsible for damage to property or bodily injury. It is also a good idea to verify the contractor’s bonding status, which is required in some states.
In the event of a loss, it is important to notify your insurance company as soon as possible. The insurance company will then send an adjuster to inspect the damage. You should be present during the inspection to ensure that all damage is accurately reported. In addition, it is a good practice to conduct regular maintenance and inspections on your roof to reduce the risk of future problems.
Porta Potty Rental Costs
Renting portable restrooms for events and construction projects is an affordable way to address onsite sanitation. Modern porta potties also support sustainable and eco-friendly waste management practices.

The cost of a porta potty rental varies depending on the unit type and duration. Standard special event units are usually a one-time fee, while luxury restroom trailers can be rented for longer periods. Contact Reliable Port A Potty now!
The cost of potty rental can vary significantly depending on the type and location. Some companies charge higher rates for more luxurious units, while others offer lower prices for standard models with basic features. Other factors that influence the price include the duration of the rental, delivery and setup fees, and additional services such as waste disposal and cleaning. Understanding these variables can help you budget effectively for your project or event.
For example, the cost of a standard porta-potty with two stalls can be around $75 to $100 per day. This includes delivery, setup, and pickup fees. In addition, you should consider the number of people attending your event and how long they will be there. A good rule of thumb is to rent one portable toilet for every 50 attendees and four hours of activity.
When it comes to choosing a potty rental company, you should research the options available to find a company with transparent pricing and top-tier service. Some companies may lure customers in with low base prices, but then add on a plethora of hidden charges. Choosing a reputable provider with a proven track record of reliability and customer reviews can save you money and stress in the long run.
The average cost of a potty rental is about $80 to $175 for a short-term rental that lasts from a few days to a week. Some companies even offer package deals that include multiple units at a discounted rate. This is a great option for outdoor weddings, backyard parties, festivals, and concerts.
In addition to the cost of a portable toilet, you should also consider the cost of any additional services or amenities you might need, such as air conditioning, sophisticated furnishing, and handicap accessibility. While these upgrades can add to the overall cost of a portable toilet, they can provide a better experience for your guests and ensure that your event is safe and comfortable.
For longer-term projects or events, it is best to negotiate a monthly rental contract with the portable toilet company. This will allow you to save more money on the cost of transportation, cleaning, and maintenance. In addition, a monthly contract will provide you with peace of mind that you will have portable toilets available when you need them.
Unit type
The type of porta potty rental you choose can have a significant impact on the cost. You can find basic standard units, deluxe models with more amenities, and even luxury portable restroom trailers. Choosing the right unit type is key for a successful event or construction project. It is also important to understand the daily rental costs, which typically include delivery and setup fees. This can help you budget accurately for your specific needs.
The unit type of porta potty rental you need depends on the size of the crowd and the length of time you need the unit. For example, a temporary construction site may require standard portable toilets, while an outdoor concert or wedding might call for a deluxe model. It’s also important to consider the location of your unit. You want to make sure that it is conveniently located and out of the way of ongoing work. You can also save money by renting multiple units at once.
You should ask your rental company for a detailed quote that includes all charges. These fees can include a damage waiver fee, reservation fee, fuel surcharge, waste-handling, cleaning and maintenance, premium charge, and more. A reputable porta potty rental company will offer transparent pricing and top-tier service.
When choosing a porta potty rental, be sure to compare the quality and features of different units to make the best choice for your needs. Some companies may lure you in with low base prices but add in a lot of hidden fees. Others, like Viking Rentals, prioritize transparent pricing and high-quality service.
Some additional tips for budgeting for portable toilet rental costs include assessing the duration of your project and estimating the daily numbers of people you will be serving. It’s also a good idea to overestimate your numbers, as this will help you avoid situations where the number of people exceeds the amount of facilities available.
If possible, rent portable toilets during off-peak times. This will save you money and ensure that you get the best units for your budget. This is especially important for large events and long-term projects, as these units are more likely to be in high demand during peak seasons.
Delivery and setup
Whether you’re hosting a music festival in Brooklyn, organizing an outdoor event in Queens or preparing for a construction project in New York City, human waste disposal is likely to be an issue. Luckily, there are many ways to minimize costs without sacrificing convenience. By planning ahead, renting in bulk and choosing basic units, you can save money on your porta potty rental while ensuring adequate facilities for your guests or workers.
The standard portable toilets most people are familiar with are small, portable restroom stalls made of lightweight plastic that are used at events and on construction sites. They are equipped with a toilet and urinal, as well as soap and paper towels. They also contain blue deodorizing chemicals to disinfect the unit and manage waste. In addition, most rental companies provide toilet paper and hand sanitizer dispensers. They may also offer a handwashing station that includes a sink, soap and paper towel dispensers.
Porta potty rental fees vary depending on the type of unit and its location. Some rentals include a tank and delivery, while others have additional charges for cleaning, waste disposal, and site cleanup. These fees should be clearly explained in the contract, so you can make an informed decision. It’s also important to understand how pricing changes during peak seasons, when demand is high.
Most rental companies have a basic chart that provides recommendations for the number of units needed for various events. However, these recommendations can vary, and you should always consult with the supplier to ensure that your event is properly planned. For example, two standard portable toilets are enough for a concert with under 1,000 people. For construction sites, one portable toilet per 10 workers is recommended.
When you rent a porta potty, the rental company will deliver it to your site and set it up. They will need a clear pathway to the location and a truck or trailer with a mechanical lift to unload the unit from the back of the truck. They will then lower the unit from the tailgate and straps, and place it on a stand or other foundation. Once the rental period is over, the company will come back to retrieve it and dispose of the waste.
What You Should Know About Invisalign
Invisalign Las Vegas is a treatment option that can correct a variety of orthodontic issues. This includes overcrowding, gaps between teeth and various bite problems.

The process starts with a consultation with an Invisalign-trained doctor. Using advanced 3D scanning technology, they will create a customized treatment plan for your specific needs. This personalized approach provides the best results and addresses any complex alignment issues that might not be addressed by generic mail-in aligners.
Invisalign uses clear plastic trays to straighten teeth without the visible wires and brackets that are often associated with traditional braces. The trays are nearly invisible and blend in with the natural color of your teeth, making them an ideal choice for adults who are concerned about how their orthodontic treatment will affect their appearance. Invisalign also has a shorter treatment time than traditional braces, which can be an important consideration for busy adults.
Like any orthodontic treatment, there is a chance that you will experience mild pain or discomfort while wearing Invisalign. Typically, this discomfort is highest during the first week of wear. However, it can vary based on your individual pain tolerance. It is also possible that you may not feel any pain at all during your Invisalign treatment. If you do experience pain, a visit to your Bolton orthodontist can help determine whether it is an indication that the trays are working as intended or if there is a more serious issue that needs to be addressed.
You can reduce the amount of pain you feel while you are wearing Invisalign by brushing your teeth after each meal and before putting your trays back in. This will help remove any food debris that could irritate your gums and tongue. You can also use a toothpaste that is specifically formulated for sensitive teeth. You should also avoid using hot water to clean your Invisalign trays, as this can cause them to warp and negatively impact the fit of the trays.
One of the biggest benefits of Invisalign is that it is more comfortable than traditional braces. Although you can expect a little bit of discomfort when you begin your Invisalign treatment, this should not be as painful as the initial discomfort experienced with metal braces. Invisalign is able to accomplish this because it applies less pressure on your teeth.
Invisalign trays are designed to gently shift your teeth into place over the course of a few months or two years. Each new set of trays is crafted to move your teeth just a little bit more than the previous ones did, helping you get closer to a straighter smile. You will receive a new set of aligners every six to eight weeks until your treatment is complete.
Comfortable
Invisalign uses a series of clear, removable aligners that are custom-made with 3D computer imaging technology to straighten your teeth. They’re comfortable to wear and don’t require metal wires and brackets, so patients can enjoy their favorite foods and activities without any limitations or restrictions. However, it’s important to note that the success of Invisalign treatment depends on a patient’s ability to comply with wearing their aligners for 22 hours a day. This is why it’s best for older teens and adults to choose Invisalign over children, as they may have trouble staying compliant with the treatment plan.
It’s important to know that Invisalign is a gradual process that will shift your teeth gradually. For this reason, it’s possible that you may experience some discomfort or sensitivity as your teeth move and adjust to their new positions. However, this is a normal part of the process and will subside after a few days. Using toothpaste that is designed for sensitive teeth can help mitigate this. If you have any questions or concerns about your comfort, speak with a Maple Dental Health dentist for recommendations.
During your Invisalign treatment, you’ll meet with an experienced dental professional regularly to make sure that you’re on track to achieve a beautiful new smile. They’ll examine your trays to make sure they fit correctly and provide you with each new batch of trays as needed. Regular face-to-face checkups ensure that your progress is being monitored, and any potential problems can be addressed promptly. This is a major advantage of Invisalign over mail-in or DIY aligners, which often rely on self-assessment and remote monitoring.
If you have a high-deductible health insurance plan, an HSA, or another flexible spending account, you may be able to use funds from these accounts toward your Invisalign costs. If not, many dental offices offer flexible payment plans that allow patients to spread out their payments over a year or more.
Invisalign is an excellent choice for adults and teenagers who want a confident new smile. However, children who have a hard time remaining compliant with their Invisalign treatment plan may be better candidates for traditional metal braces.
No Food Restrictions
Many individuals avoid traditional braces because they do not like the idea of having to live with food restrictions. Invisalign’s clear aligners are removable, so you can enjoy any foods that you normally would. However, it is important to remember that the aligners must be removed before drinking anything other than water. Consuming any other beverages can damage the aligners or leave residue on them that will negatively impact your oral health.
Sticky foods, such as chewing gum, jelly beans, or caramels, can pull and tug at the aligners. This can cause them to break or become discolored. Additionally, eating while wearing your aligners exposes them to acid that can weaken the enamel and lead to tooth decay. This can also cause the aligners to wear down, leading to discomfort or a possible loss of alignment.
If you are concerned about the impact of your diet on your Invisalign treatment, the team at Hanson Place Orthodontics recommends eating soft, steamed or grilled foods that do not require much chewing. This will help reduce the risk of gum or other sticky foods causing damage to your aligners. In addition, it is important to safely store your aligners in their case after every meal and follow a proper cleaning routine before reinserting them.
Hard and crunchy foods, such as nuts, ice chips or popcorn, can chip or break the aligners. This can result in pain or a delay in the treatment process. In addition, they can also cause bacteria growth on the teeth and in the mouth that can lead to cavities or gum disease.
The Invisalign treatment schedule requires that you wear your aligners for 20-22 hours a day. If you do not wear your aligners as directed, you may experience a longer treatment time. The best way to stay on track with your Invisalign treatment is to make a habit of consistently wearing your aligners during the day and properly storing them at night. Additionally, be sure to brush and floss your teeth regularly to keep them free of food debris, plaque and bacteria that can harm the teeth and the aligners.
Shorter Treatment Time
When it comes to straightening teeth, Invisalign is significantly faster than metal braces. While it depends on your individual needs, most patients will see results within 12 months. This is in part because the clear aligners are less invasive and require much less maintenance. Invisalign treatment also doesn’t interfere with your daily routine like metal braces can, which makes it easier to keep up with your regular oral hygiene regimen.
The exact length of your Invisalign treatment will vary from patient to patient, however there are some things that you can do to speed up the process and achieve the best results. One of the most important factors is how compliant you are with your orthodontist’s instructions. It’s crucial to wear the clear aligners for as many hours as possible and avoid removing them unnecessarily. If you have trouble remembering to put them in and out, ask your orthodontist to give you a schedule so that you can stay on track with your treatment.
Another factor that impacts your Invisalign treatment time is how severe your misalignment is. Some minor cases of crowding can be corrected in as few as six months, while more severe issues will take closer to a year. If you have gaps between your teeth, known as diastemata, the treatment can be even longer as these will need to be closed before the end of the process.
Your age also has an impact on the length of your Invisalign treatment. Younger patients tend to have more malleable bones, which can make it easier for their teeth and jaws to move. This means that they can often get their desired orthodontic outcome in a shorter period of time than older patients.
Lastly, the type of food you consume has an effect on how long your Invisalign treatment will last. Some foods can slow the movement of your teeth, which will prolong your treatment time. It’s crucial to eat healthy during your Invisalign treatment in order to make it go as quickly and smoothly as possible. By limiting the amount of sugary and crunchy foods you eat, you can ensure that your teeth are moving at a steady pace and achieve the fastest results possible.
Roof Repair – The Unsung Heroes of Roofing
If you see holes, gaps, or visible sagging in your roof, don’t wait to get it repaired. Every day your compromised roof goes unrepaired is another day it’s vulnerable to rain, snow, and other weather.
If you have a shingle roof, you should regularly assess it for signs of damage, including shingles that are coming loose or missing. Missing shingles should be replaced promptly to maintain the integrity of your roof and protect your home from water penetration. If you spot a problem, the good news is that most of the time, it will not require a complete roof replacement. Instead, a simple repair may suffice, mainly if it is addressed quickly. Contact Red Stick Roofing Of Louisiana for professional help.
Before attempting any roof repairs, however, it is crucial to have the right tools and materials at your disposal. If you don’t have the necessary tools, or if you aren’t comfortable working on your own roof, it’s best to hire a professional roofing contractor. With the right equipment and a clear understanding of the steps to take, it is possible to fix a shingle roof yourself.
First, carefully assess the shingle situation from ground level. Ideally, do this after a rainstorm. This will help you see any displaced shingles and will reveal the extent of the damage. It will also help you determine whether the repairs are minor or if a more comprehensive roof replacement is warranted.
Once you’re on the roof, it is important to work safely. Make sure you have a ladder that is stable and that you aren’t leaning against any areas that are already damaged. It is also a good idea to wear rubber gloves and safety goggles during this part of the process, as you will likely be handling sharp debris.
The next step is to gently lift the target shingle. It will be bonded to the shingle above it with asphalt sealant, which can usually be broken by sliding a flat pry bar underneath the edge of the target shingle. This is best done in cool weather, as the sealant will be easier to shear off.
Once you’ve removed the target shingle, remove all of the nails that held it in place. Be careful not to rip any other shingles when doing this, as this can lead to leaks. Next, simply slide the new shingle into place and nail it in. It’s also a good idea to put a dab of roof sealant over the new shingle, as this will help ensure that it holds up against future storms.
Flashing
While roof shingles and gutters tend to get most of the attention in roof repair situations, flashing is one of the unsung heroes of roofing. Flashing prevents water penetration into buildings and helps to direct moisture away from walls. It’s usually made of metal and found around the perimeter of vent pipes, chimneys, dormers, window openings and other roof penetrations.
Professional roofers often install flashing to seal leaks that can damage the interior of a home. Without it, moisture would drip into the crevice between the wall and roof decking and potentially leak through the shingles. Flashing also protects areas of the roof that are prone to leaks, such as the inward creases at roof valleys and rake edges.
Roof flashing is typically made of galvanized steel or aluminum. It’s installed over the underlayment and underneath the shingles on shingled roofs, or over the top paneling of metal roofs. The flashing is typically sealed with caulk. Flashing is designed to flex as the building expands and contracts during seasonal changes. For this reason, it’s best to install flashing with built-in expansion joints.
There are many different types of flashing. Most commonly, it’s installed in the form of L-shaped pieces that overlap each other like fish scales. The base of each L is nailed to the roof and the top bent up against a vertical surface such as a chimney or dormer.
Another type of flashing is called counter-flashing, and it’s placed above or opposite of the base flashing. This type of flashing is frequently layered at the base of a chimney to prevent water from seeping in between the chimney and roof.
When a home’s flashing is damaged, it’s important to contact a roofing contractor for repairs. A roofing specialist will know how to inspect the area and determine if there’s additional leakage that needs to be addressed. A professional will also be able to spot signs of flashing failure, including cupping shingles, swollen or sagging areas, water stains in vulnerable or odd spots, rust or staining and interior leaks. The roofer will remove shingles as necessary, expose the flashing and repair any damage.
Gutters
Gutters are long troughs attached to the fascia boards at the edge of your roof that catch and carry rainwater away from your house. They prevent moisture from accumulating on the roof and damaging the shingles, siding, soffit (the exposed wood at the underside of the roof overhang) and other structures, including your foundation.
Gutter systems are a critical part of roof repair. Without them, rainwater would flow off your roof and pool around your home’s foundation, causing cracks that could undermine it. Gutter system installation and regular cleaning keep water off your roof and away from your foundation, preventing costly damage to your house and property.
During the course of time, gutters can become clogged with leaves and twigs that are pulled in by storm winds, as well as with other debris. When this happens, the gutters can sag or move away from the roof, reducing their effectiveness. They can also leak, either from the seams or at the downspout elbows, which should be sealed with silicone caulk or metal flashing.
If left unattended, gutters can also get overrun by bugs and rodents looking for shelter or a place to live. These pests can cause rotting, which is not only expensive to fix, but it can also compromise the structure of your house.
The fascia board is the flat piece of wood attached to the bottom edge of your home’s eaves, just below the roof overhang. It serves as the surface that your shingles attach to, and it’s an important part of your roofing system. If it becomes sagging or corroded, you should replace it.
In addition to replacing a sagging or corroded fascia board, you’ll need to replace the shingle underlayment and flashing to prevent water leaks at the joints. This process is usually quite labor-intensive, so it’s best to leave it to the professionals unless you have experience doing it yourself. If you do choose to make the repairs yourself, you should use only high-quality materials to ensure that your new roof is protected for years to come. Using a quality product will help reduce the risk of problems down the road, which can save you a lot of money and stress in the long run.
Attic
The attic is the space directly under the roof and above the top floor of your house. It may be a cramped space barely large enough to fit a box, but it’s important for the safety of your home.
It’s where mold grows and can cause health problems for those living in the home. As such, it’s critical to keep it free of mold spores. If a roof leak occurs, it can allow mold spores to enter the attic and begin growing. Fortunately, roof leaks can be repaired quickly with the help of a professional.
In addition to checking for a roof leak, a professional will inspect your attic for issues such as damaged insulation. Damaged insulation is not only inefficient, but it can also lead to mold and wood rot. This is why it is important to have adequate attic insulation to protect your home from moisture.
A poorly insulated attic can actually make your home more expensive to live in. It allows paid-for heat to escape through the roof. However, improved attic insulation can prevent this from happening and save you money on energy bills.
You can check your attic insulation by looking for cracked housings on plastic roof vents and broken seams on metal ones. You should also look for shiners, which are nails that have missed the framing members and appear white due to frost. These need to be clipped to prevent water from condensing on them and causing damage.
If you are planning to do any work in your attic, it’s best to wear a dust mask. Many types of insulation contain airborne particulates that can cause respiratory issues. You should also be careful not to snag your ceiling joists with your tools or drop anything on them as they may fall through. You should also lay a sheet of plywood across the attic joists to protect them. This is a good idea for any attic repairs, too, as it will protect the attic floor from damage caused by falling tools and materials.
Types of Roofing Materials
A roof protects a home from rain, snow, sunlight, and temperature extremes. Storm Tech Roofers can add beauty and value.
There are many roofing choices. Some are simple, such as asphalt shingles or sheet metal. Others are more complex, such as clay or slate tiles. The most important thing is that the roof dries quickly and efficiently to prevent water damage inside the home.
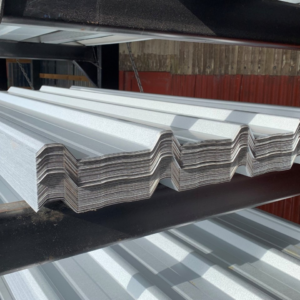
Sheet metal is a type of material used to create a variety of products and parts. It comes in a wide range of thicknesses, from extremely thin pieces to thicker sheets that are used as roofing materials. It can be made from a number of metals, including cold rolled steel, aluminium, brass, tin and copper. It can also be made of other alloys, such as nickel and titanium.
Traditionally, sheet metal has been a common choice for industrial and commercial buildings. However, it has recently become a popular option for homes as well. This is due to the fact that it is long-lasting, durable and energy efficient. It is also able to reflect solar radiation, which helps to reduce cooling costs. Additionally, it is environmentally friendly, and there are often tax incentives for using this type of roof.
There are a few different ways that this type of roofing can be constructed. Some use a standing seam, which has no exposed fasteners. Others, like corrugated metal, use a rolled design that creates wavy seams that overlap each other. A third style of roof uses a shingle-like panel that can be pre-fabricated or formed on site. These panels can be joined together by either clipping the female leg to the male leg or using a nail flange.
These panels can be made of a variety of different alloys. They can also be shaped in various ways to give the structure a unique appearance. They can even be coloured to add a decorative element to the roof. This makes them a versatile roofing option that can complement a variety of styles.
Throughout the world, sheet metal is used in an incredible variety of applications. It is found in intense industries such as automotive, mining, aviation and manufacturing. We also see it in everyday items, such as the metal surround on a kitchen bench top or a unique punched metal screen that is used for an interior design feature. It is also an excellent roofing material, as it can withstand extreme weather conditions. It is also fire resistant and noncombustible, making it a great choice for homes in communities that are prone to wildfires.
Asphalt shingles are one of the most common roofing materials. They are easy to install and offer a wide variety of colors, textures, and styles to match the aesthetic of your home. They also provide excellent durability and resistance to different weather conditions. However, they are not as strong as other roofing materials and may not be the best option for areas that experience a lot of wind.
Typically made from a fiberglass base with a coating of composition asphalt, these shingles are available in several different options to meet the needs and budgets of homeowners. They are a great choice for homes with moderate to steep slopes. They are also known as laminated shingles, which is due to the fact that they are constructed of multiple layers. These layers are then covered with ceramic granules to protect the roof from different weather elements and enhance its appearance.
There are four different types of asphalt shingle roofs: three-tab shingles, architectural shingles, upgraded architectural shingles, and luxury or designer shingles. Each performs a different function depending on the look you want and the purposes your roof is designed to serve.
Three-tab shingles are the most basic type of asphalt shingle. They have a single layer, are thinner than architectural shingles, and are not as durable. These shingles are often the most affordable and used in low-value homes. Architectural shingles are thicker and have a more dimensional appearance on the roof. They are also more durable and can withstand stronger winds than three-tab shingles. They are often the most popular shingle style for homes
Upgraded architectural shingles are thicker and have more layers than regular architectural shingles. They are a bit more expensive but offer a higher level of durability. They are often the choice for homeowners looking to add a more premium and elegant appearance to their roof. They are also often more energy-efficient than three-tab and architectural shingles.
Luxury or designer shingles are the highest-end shingles on the market and designed to simulate the appearance of wood shakes or natural slate tile roofs. They are more expensive but offer the most premium and attractive appearance on your roof. They are usually the most durable as well, offering a 50-year non-prorated manufacturer warranty.
When most people think about the “face” of a roof, they probably imagine asphalt shingles, cedar shakes, rubber membranes or other materials. But these surface materials are only half of the story – underneath them are layers that protect and contribute to a roof’s resilience against exposure elements such as rain, wind, snow, hail, ice, fire and sun. During a roof inspection, it’s important to assess the condition of these underlayment layers as well.
A key function of underlayment is to repel water and prevent moisture from penetrating the roof deck in the early stages of a new construction project. Builders and roofers refer to this as the “dry in” phase of a roofing job. For reroofing, underlayment also helps to repel moisture and prevent the growth of mold, mildew, fungus or other damaging organisms.
There are several different types of underlayment material, with the most common used in residential, steep-slope applications being black, ashphalt-saturated felt paper. This product may be produced with either a cellulose or fiberglass base material, and is generally available in 15-pound and 30-pound versions. Fifteen-pound felt is less expensive but does not offer the same level of water resistance as 30-pound felt.
Some roofers also use a variety of synthetic underlayment materials. These are typically manufactured with polypropylene or polyethylene, which are the same basic materials that are used to make a wide range of other products including food containers, rope and long underwear. These synthetic underlayment materials are lighter than felt, and are usually non-skid. Rolls of this type of underlayment are often provided with a selvedge edge along one side, which creates a strong, watertight seal where rolls overlap.
Many roofers use a combination of felt and synthetic underlayment for their projects, depending on the needs of each project and client. All underlayment should be installed in accordance with the manufacturer’s guidelines, and building codes for the particular roof system style. In general, underlayments should have a permeance rating of at least 5 perms – or allow water vapor to pass through but resist liquid water penetration.
Flashing is a thin material that professional roofers install around critical areas of the roof, where it meets a vertical surface like a wall or dormer. Its purpose is to prevent leaks where water might otherwise seep into the wall or into the roof itself. There are several types of flashing designed for specific features, such as chimneys and roof windows.
There are also specialty flashings, such as ridge cap flashing, which is installed at the peak of the roof to create a waterproof seal. Vent pipe flashing is another specialty flashing that protects the roof where pipes penetrate it. Flashing also comes in different shapes and sizes to suit a particular situation, such as f-shaped drip edge flashing, which is often used on tile roofs, or valley flashing, which is often installed to protect the area where two different slopes of a roof meet.
Most flashing is made of metal, and the most common is galvanized steel. However, aluminum, lead, and other malleable materials may also be used for flashing. There are pros and cons to each type of material, and it depends on the situation and the environment in which the flashing will be installed.
For example, galvanized steel is an economical choice for most flashing applications because it’s inexpensive and durable. However, it can rust in salty seaside environments or when it comes into contact with masonry. Aluminum is another economical option, but it doesn’t last as long as copper or zinc alloy and requires coating to prevent corrosion. Lead is also a flexible material, but it’s less durable than other options and can leach toxic chemicals into the soil.
Although flashing doesn’t require regular maintenance, it should be inspected periodically for signs of damage or leaks. This includes checking for cupping shingles, swollen or sagging areas, rust stains, water stains in vulnerable or odd areas of the roof, and interior leaks. If you notice any of these symptoms, it’s a good idea to call a roofing contractor as soon as possible. They can better identify the source of the problem and repair or replace any damaged flashing.